A few things to consider before making a veil. Consider how long do you want to veil to be. Do you want a blusher or not? What kind of edging do you want? Do you want any gathers, if so how much?
This DIY tutorial is for a simple veil with blusher, no gather, no edging. In near future there'll be other tutorial for other style of veil. For now, we'll start with this one. It's simple yet elegant, and easy to create. This veil is about 29" long with blusher 16" long.
Supplies needed:
-tulle (about 1 1/5 yards)
-ribbon (1/4 width, about 1 1/2 yards)
-hand sewing needles
-comb (you may use metal or plastic)
-thread
-pins (3)
-scissor
-ribbon (1/4 width, about 1 1/2 yards)
-hand sewing needles
-comb (you may use metal or plastic)
-thread
-pins (3)
-scissor
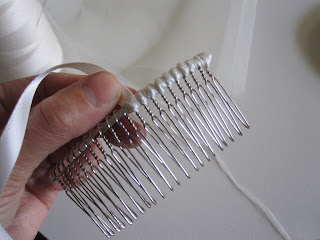
Starts by wrapping the comb with ribbon.
I go through each slot twice or three times depending the spaces between the slots.
Once your get to the end, wrap the ribbon back two slot. Then trim ribbon down to 1/2 inches.
Fold ribbon down to itself, then fold again to hind the edge. Pin and stitch it secure.
Cut the tulle into 45" circle. Fold the tulle, under layer 29"(veil) and upper layer 16"(blusher). Once you have it folded, find the mid point on the fold. Place the comb on top.
Pin the tulle to the comb. Make sure the mid point is pined right at the center of the comb.
Stitch the tulle to the ribbon on the comb.
Once you've attached the tulle to the comb, flip the comb over and there you have it.
With this veil, you can add ribbon or lace to the edge if you want it to be more elaborate details. Perhaps even feathers, let your imagination fly.


No comments:
Post a Comment